Showing posts with label scrapbook. Show all posts

Friday, November 24, 2017

Heartfelt Creations November Blog Hop-Christmas mini album


Hello! Time for another Heartfelt Creation's blog hop! Are you ready for Christmas? Do you have your scrapbook albums complete and ready to load all of your wonderful photos into? This is such a hectic time of year, I always try to get my handmade gifts and December Daily album done in advance. One less thing to worry about, eh?

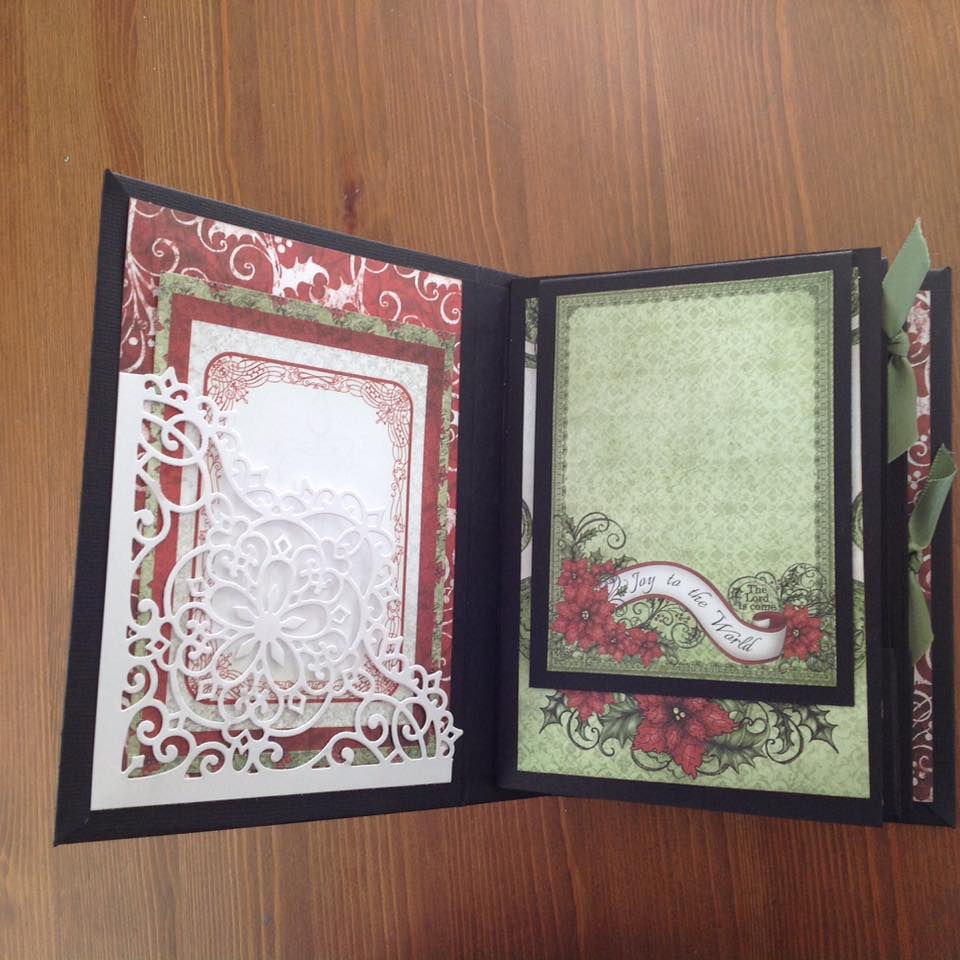
This little album uses Heartfelt Creation's Sparkling Poinsettia collection. I adore this collection. I love the classic red and green color scheme and the elegant designs throughout. It also pairs beautifully with black card stock. This is a hinged mini album with plenty of tucks and tags and space for someone to add their own photos and journaling. I cannot share the tutorial for making this album, as I paid for the instructions. But...there are so many you tube videos out there that show you how to create something very similar. :) 


The Hop starts at 8am EST on Friday November 24th and closes Monday the 27th of November at 11.59pm EST.
A random comment will be chosen from the participating blogs for a $25 Heartfelt Creations gift card! The winner will be announced on the HC blog and on FB on the Wednesday the 29th of November.

Here is a list of participants in case you get lost!


Wednesday, August 19, 2015

Heartfelt Creations: Farmer's Market

Hello! I am sharing a card using Heartfelt Creation's new Farmer's Market collection. I love the jars in this collection. I used some 3D laquer to go over the jar to give it a glossy sheen. It is hard to photograph, but in "real life" it looks like glass.
I also created a fun layout using papers, stamps and dies from this collection. You can find the tutorial for recreating this layout HERE.
Make sure you check out the Heartfelt Creations blog for more inspiring projects. You will find instructions and product lists for recreating all of the projects you see on their site!

Wednesday, July 8, 2015

Heartfelt Creations: Sparkling Poinsettia debut!

Hi there!! Today I have a project from Heartfelt Creations. I just love their new Sparkling Poinsettia collection. Summer is the perfect time to get started on all of those holiday projects, that you will not have time for in December. :)
Make sure you head on over to the Heartfelt Creations blog to see all of the other amazing projects by the design team!

Emily

Wednesday, January 28, 2015

Heartfelt Creations: Birds & Blooms layout

Hello! Today I am sharing a page using more of Heartfelt Creation's Birds and Blooms collection. I don't make too many traditional 12x12 layouts any more, but I knew I wanted to make a page of my sweet niece the minute I saw this collection! I used stamps, papers, and dies from this collection to create this page.
You can find the product list and instructions for recreating this page, along with many other inspiring projects from the design team on the Heartfelt Creations blog.

Wednesday, March 19, 2014

Heartfelt Creations: Retro Layout

Hello! Today I have a layout to share using stamps, paper and dies from Heartfelt Creations Once Upon A Time collection.  I couldn't resist using this retro image on a layout with pink and teal.

Make sure you check out the Heartfelt Creations blog for more inspiring projects. You will find product lists and instructions for recreating hundreds of projects!

Thanks for stopping by!

Emily

Wednesday, January 1, 2014

Heartfelt Creations: Vintage girl layout

Happy New Year!!! I hope you all are blessed with friends, family, health and wealth in 2014.  I am hoping to complete a bunch of scrapbooking this year. It is something that I have recently gotten back into, and I would like to continue on that path. It is how I started down this crazy path of papercrafting after all. :)
Today's layout features yummy stamps and dies from Heartfelt Creations. I used stamps and dies from several collections. You can find the product list and instructions for recreating this page on the Heartfelt Creations blog.
See that leafy die behind my rose? I used the leftover negative and some white acrylic paint, to add the white stenciled leaf images through out the layout.  LOVE the way it turned out!

Thanks for stopping by!

Emily

Wednesday, December 11, 2013

Heartfelt Creations: Cherish The Moment

Hello! I have a scrapbook page using Heartfelt Creations Floral Key collection to share with you today.  I used different Floral Key paper elements along with the fabulous die cut lock and keys to create this layout.  I love vintage photos, and this collection is perfect for showcasing them.
 Make sure you check out the Heartfelt Creations blog for more inspiring projects from the design team!

Emily

Wednesday, October 9, 2013

Heartfelt Creations: Sweet Juliet Collection Debut

Hi, there!  Today I would like to share a mini album I made using brand new stamps, dies and papers from the Heartfelt Creations Sweet Juliet collection.  I love all of the elements in the Antiquity paper collection. They were so perfect for a heritage album.  I also love the beautiful flower die that is made so that you can use a brad to hold the flower together in the middle! Genius and so easy to make and layer.
Page one

Page two

Page three

I used an old photo cover from one of my antiquing trips to create this fold out.  I love the staining on it and one of the 3x4 journal cards from the Antiquity paper collection fits perfectly inside.  You could also add a photo!

Page four

Page five

Make sure you check out the Heartfelt Creations blog for more inspiring projects from the design team!

Thanks for stopping by!

Emily

Wednesday, July 3, 2013

Heartfelt Creations: Wash Day...

Hello!  I created a scrapbook layout for today, using stamps, dies and paper from Heartfelt Creations.  I found the vintage photo of the lady hanging wash on-line.  I love finding old photos in both antique stores and on the net.  I really wish I had a photo of my grandma hanging wash on the line in her back yard.  I used to love to help her.  I would run through the sheets as they were hanging, because I loved that fresh smell!
You can find the product list and the complete instructions for recreating this page below:

HCPC 3541-Summer Season PreCut Set
HCPC 3394-Classic Bella Rose PreCut Set
HCD 712-Bella Rose Die
HCD 737 Ornate Gateway Die
HCDP1 234 Daphne Paper Collection
other products: White cardstock, white tag, paper doily, mini wood clothespins, pink baker's twine, Old Paper distress ink, Memento Tuxedo Black ink, Prisma pencils, Versamark ink, clear embossing powder with glitter, Thickers black alphabet letters, half pearls, vintage photograph
Stamp Summer Season image onto white cardstock with black ink. Color with Prisma Pencils or coloring medium of your choice. Distress edges with Old Paper distress ink. Use Ornate Gateway die and cut from white paper one decorative piece and adhere to bottom of Summer season image.  Cut a 4" x 6" piece of pink Daphne patterned paper.  Stamp lace image from Summer Season set towards top in Versarmark ink and then sprinkle with clear embossing powder mixed with fine glitter. Use heat tool to set.  Use Thicker's alphabet letters to spell "WASH DAY" under embossed area on pink panel.  Adhere half pearls under "day".  Stamp and color rose image and use coordinating  Bella Rose die to cut. Adhere finished rose to white tag and distress edges with Old Paper ink.  Tie Baker's twine bow through top of tag and add a mini clothes pin to the top.  Cut paper doily in half.  Now layer everything onto center of 12 x 12 Daphene patterned paper as seen in photo.  I used foam dimensionals on the tag and the Summer Season image.  Last, add two clothespins to top corners of colored Summer Season image square.  Attach a piece of baker's twine and loop it through the clothes pins and let the extra hang down.  I tacked my down with a tiny drop of glue on each side.

Make sure you check out the Heartfelt Creations blog for more inspiring projects from the design team!

Thanks for stopping by!

Emily

Wednesday, May 15, 2013

Heartfelt Creations: Vintage Wedding Layout

Hi, there! Today I am sharing a vintage wedding layout using stamps, paper and dies from Heartfelt Creations.  The vintage photo was a photograph in my "stash".  I love grabbing old photos up when I go antiquing.  I love this one so much, that I actually made a copy of it so that I can save the original. 
Make sure you stop by the Heartfelt Creations blog to find more inspiring projects from the design team!
Thanks for stopping by,

Emily

Tuesday, March 12, 2013

Project Life: Week 8

Hi, there! Today I wanted to share some more of my Project Life album.  Week 8 included a trip to a local hibachi grill before my hubby went out of town on a snowmobile trip up north, with my dad and BIL.  I included a screen shot of the weather close to where they were, and my hubs was super great about getting some good photos on his trip.  While he was gone, I had all of the boys conferences, basketball tournaments, and a trip to see my sister's show choir perform.
I finally got my oldest to pose for some photos! HOORAY!
For conference night, I took a photo of one of the teacher's desk area. I also added a photo of Luke's artwork that was hanging in the hall.  He was super excited to learn about different presidents this year.  I got a snap shot of my sis with her girls and my boys after the show.   My guys were very impressed with their aunt's hard work and amazed at what she and her students put into the show.

I am linking this over at Project Life Tuesday with The Mom Creative!

Thanks for stopping by!

Emily

Thursday, February 28, 2013

Project Life: Week 6 & Week 7

Hi, there!  Today I have two weeks of Project Life to share with you.  I focused on the Superbowl and Luke's Pinewood Derby for week six.  We usually have our own little Superbowl party at home, so I wanted to show photos of the food and snacks we ate to celebrate.  I also took a photo of the final score on our TV.  I waited to get the back of Joe Flacco's jersey, since he was MVP of the game. 
For the Pinewood Derby Spread, I included Luke's "pit pass" and made a couple collages, so I include more photos.  The papers were some old Cosmo Cricket that matched the Seafoam kit perfectly!
Now on to week 7!
This week is all about Valentine's Day and my son's broken arm and surgery.  I did a collage of photos of him at the hospital and of his x-rays.  I also took some photos of him visiting with family throughout the week.  The second page is all about Valentine's Day and school parties.
I am linking this to  The Mom Creative: Project Life Tuesday!

Thanks so much for stopping by!

Emily

Wednesday, February 27, 2013

Heartfelt Creations: Beautiful You...

Hello!  Today I am sharing a scrapbook layout made with Heartfelt Creations products.  I love the vintage looking images in their Sunny Days collection.  I am a sucker for vintage photos, and love to use Sepia on my photos.  The colors in this collection work perfectly with aged photos.  You can find the product list and instructions for recreating this layout below.

HCPC 3518-Vintage Watering Can PreCut Set
HCPC 3509-Timeless Sentiments PreCut Set
HCDP1 230 Sunny Days Patterned Paper Collection
HCD 730 Decorative Butterfly Corner Die
other supplies:  white cardstock, page from an old book, vintage button, May Arts burlap twine, Distress inks in Old Paper and Walnut Stain
Use a 12x12 piece of Sunny Days patterned paper for your layout base. Cut a 6x6 piece of Sunny Days patterned paper (small blue floral print) and mount your photo in the center.  Add a sentiment block underneath the photo.  Use Decorative Butterfly Corner die and white cardstock to create corner piece, and adhere in upper right corner of 6x6 panel.  Cut a 3.5" x 7.75" piece of white cardstock.  Stamp all three of the small floral motifs from the Vintage Watering Can set in Old Paper ink.  Ink and distress the edges.  Stamp watering can image in Walnut stain on the bottom of this panel.  Stamp "beautiful you" in Walnut stain ink along the side.  Layer both panels on top of each other toward center of 12x12 paper.  Cut strips of text from an old book page and accordian fold.  Ink edges with distress ink and adhere under sentiment.  Tie burlap twine into a bow on a button and adhere to center of pleated text.


For more inspiring ideas, please check out the Heartfelt Creations blog!

Thanks for stopping by,

Emily

Tuesday, February 19, 2013

Project Life: Week 5

Hello!  Trying to get caught up on lots of projects, including Project Life.  I am not too far behind, and one thing I love about this type of scrapbooking-it is so easy to get caught back up.  No feelings of guilt or remorse if life gets in the way, because you know the final goal is attainable!
I am getting a bit frustrated with my sixth grader, as he is NOT into having his picture taken.  I feel like I have more photos of the twins.  Don't want him to feel left out someday, so I need to get creative in how I incorporate him into my album!  In weeks past, I have included photos he has taken (sunset, his new shoes).  He won't admit it, but I think he likes that I am using some of his photos.  Gotta love Instagram and the fact that all of his photos come to my photo stream (part of my parental controls on his ipad and ipod!)
If you have any other ideas on how to include a pre-teen boy in Project Life who does not want his photo taken, please let me know!
I am linking this over on The Mom Creative: Project Life Tuesday!
Thanks for stopping by!

Emily

Wednesday, February 6, 2013

Heartfelt Creations: Faith, Hope & Love

Hello! Today I have a scrapbook page to share using stamps, dies and patterned papers from Heartfelt Creations.  I love adding denim to my cards and layouts, and the tiny flower from the posy patch die set and the Flirty Fleur stamp set worked perfectly, and matched the flowers on the fence post.  You can find the instructions and product list for recreating this layout below.

HCPC 3439-Flirty Fleurs PreCut Set
HCPC 3513 Weathered Fence Post PreCut Set
HCPC 3515-Burlap Background PreCut Set
HCD 701-Posy Patch die set
HCD 729-Decorative Corner Blossom die
HCDP1 229-Countryside Evening paper collection
other products: kraft cardstock, white cardstock, Memento Tuxedo Black ink, Distress inks in Walnut Stain and Antique Linen, Jute twine, old denim, black staz on ink, half pearls by Kaiser, Chitchat stickers by Tim Holtz, black alphabet stickers by Jillibean Soup

Ink edges of 12"x12" kraft cardstock with distress inks.  Cut Countryside evening designer paper to 11.5"x11.5" and distress edges by ripping and tearing with scissors and fingernail. Adhere to center of kraft cardstock.  Take the leftover strips of paper (reverse side) and adhere by cris-crossing along top and right side of layout.  Stamp scripture stamp in black ink and use Spellbinder circles to cut.  Ink edges with distress inks and adhere just under where the smaller stirps cris-cross.  Next cut a 5.5" x 5.5" piece of patterned paper from the Countryside Evening collection.  I used the barn board looking paper.  Tear and distress edges.  Stamp burlap background in Walnut Stain distress ink onto white cardstock and use larger Decorative Corner Blossom die to cut.  Adhere in lower left corner of 5.5" x 5.5" panel.  Adhere photo to center overlapping decorative corner piece.  Adhere photo panel to the center of layout.  Use alphabet letters and Chitchat stickers to spell "Faith, Hope, Love" under photo panel.  Tie jute twine around top just over horizontal stirp of patterned paper.  Tie in a loopy bow.  Stamp four of the tiny flower from Flirty Fleurs set in black Staz-on ink onto old denim.  Use coordinating Posey patch die to cut.  It takes several shims and several passes through your machine to cut through the denim.  Add tiny half pearls to centers of denim flowers.  Adhere one to center of jute bow, and the other three around the lower left corner of photo.


For more inspiration, please check out the Heartfelt Creations blog.

Thanks for stopping by,

Emily

Tuesday, February 5, 2013

Project Life: Week 4

Hello! Here is my completed week 4 in my Project Life Album.  I have had a couple folks email and ask what Project Life is, and how they can get the kits.  I am going to direct you to Becky Higgins site, as she is the "go to gal" for all things Project Life.  I also think her kits are AMAZING!  There are several companies out there that offer different kits or Project Life papers.  My favorites are Studio Calico (I am FINALLY off of their waiting list), Ali Edwards (great digital files if you are a digital kind of person) and Elle's Studio has some fabulous products, too. 

Thanks for stopping by!

Emily

Sunday, December 30, 2012

December Daily: Day Twenty-Four & Twenty-Five...DONE!

Day twenty-four-We were busy traveling to different family parties.  We started out with brunch at Grandma's house (hubby's side of the family), and then later in the evening we went to my aunts' house for dinner.  I was so excited to get to go to my aunts', as we have not been able to do this in a lot of years!
Day twenty-five-We started the morning off with a visit from Santa! I think it is cute that my sixth grader had the hardest time going to sleep, and was the first one in our room in the morning.  We opened the "Santa" gifts and stocking first, and then they got their presents from Bill and me.  The were crazy excited to open their very own iPads.  I am glad that I will no longer have to share mine with three boys. :)
They were also surprised to find an aquarium with their very own hermit crabs.  The video of them opening the ipads and seeing the hermit crabs is priceless!

Thanks for hanging with me while I completed my December Daily.  I think I am going to take the Project Life plunge, so you will have to put up with some more scrapbooking in the New Year!  I will soon be back to regular blog post with my cards, too!

Emily

Friday, December 28, 2012

December Daily: Day Twenty-Three

Day 23-We were able to celebrate Christmas with my hubby's extended family this year!  We had fun visiting with aunts, uncles and cousins that we normally do not see on a regular basis.  Aunt Cathy had a fun scavenger hunt for the younger kids, and the adults did a white elephant gift exchange.  Max and Luke fell asleep on the ride home! 
I am going to try to post Christmas Eve and Christmas day tomorrow or Sunday.  Once my kiddos are back in school next week, I hope to get back to my normal blogging routine.  It is nice to take a little break.

Thanks for stopping by,

Emily

Sunday, December 23, 2012

December Daily: Day Twenty-one & Twenty-two

Day Twenty-one-Our first snow of the year! Just a dusting, but snow none the less.  We were also busy with Christmas parties at school.  Super lucky this year that Max and Luke's classroom's are right across the hall from each other.  It allows me to zoom back and forth and see them.  Max is making ornaments in the upper left corner, and Luke and his friends used toilet paper to decorate their friend as a snowman.  So cute!
Day twenty-two-Basketball, Taekwondo, and an evening of looking at our favorite local light displays and Nativity scenes.  We made sure to stop and get some peppermint mocha's and hot chocolates before we started our venture.  Now...let the crazy Christmas travels begin!  We will be traveling to five parties in the next four days. I haven't done this in a lot of years, but now that Max and Luke are older, we decided to give it a go.  Hopefully they will not be grumpy when Christmas actually arrives!

Thanks for stopping by!

Emily